Archivo de la categoría: Java

Youtube API – How to copy the WatchLater List

Disclaimer

All the code here has been tested for 5 or 10 minutes… Use at your own risk. This is intended to be only a draft, a demo of the Youtube API possibilities and it is offered without any warranty.


OMG, It is written in English…

This post is going to be written in English. I must practice my English and write this will be a good way. So let it go…


Why do you want to copy the Watch Later List?

(don’t read this, there is no code here, continue below)  

When I code for pleasure, out of the office, at home or sometimes, on a hotel room, I have a particular way to do it. Some people likes to hear classical music, some prefer video games BSOs, some others totally silence… I like to see youtube music videos. Actually, most of the time, I don’t look at them, I only hear them but I like the way I can made a music selection on youtube. Let’s me explain it…

Before I begin to code, I do a selection of videos. The easy way of doing a selection is to add then to the “watch later” playlist. The selection last for a few days and I made a new one, normally because I want to hear a different kind of music (You know, sometime you prefer POP, sometimes Rock, sometimes games BSO…). But I don’t want to lose the old selection so I need to save it.

In the past you can do it on YouTube, you can re-organize your watch later list and copy selected videos to other list. But this is not more possible.
Last saturday evening I was very upset for this little problem so I google a little until find the youtube info API. And this article is the result. Now I can do that and a few things more…


How to do it

(if you don’t want to read more, you would prefer go to the github repository directly: https://github.com/sbgermanm/youtubeV2)

1. We need a google api client ID

1.1 Go to google api console: https://console.developers.google.com/

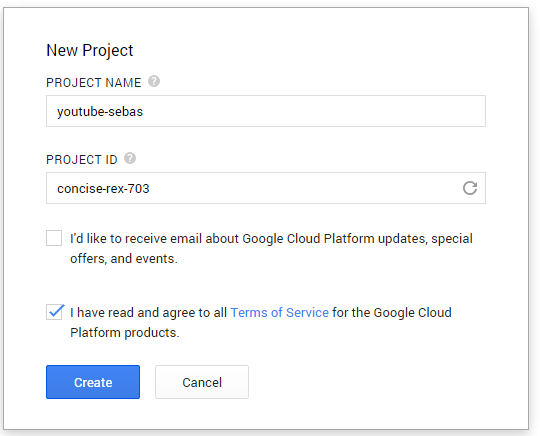
1.2 Create a new project

Crear proyecto

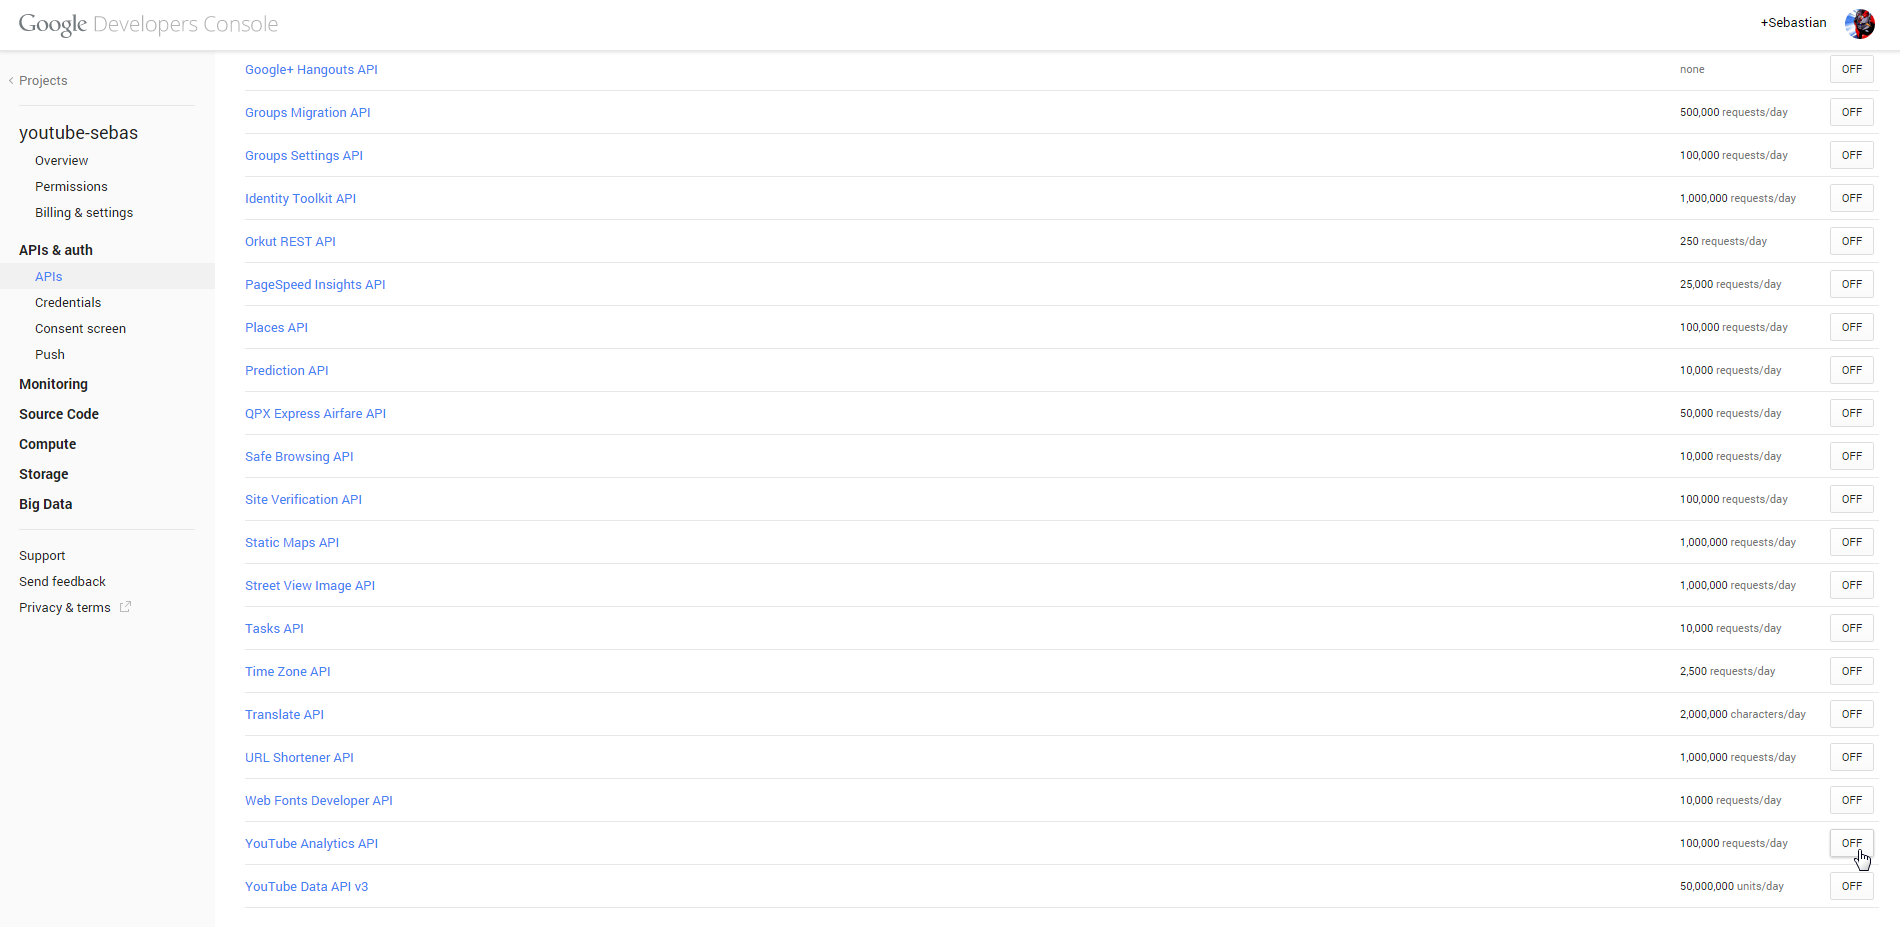
1.3 Activate youtube data api

enable api2

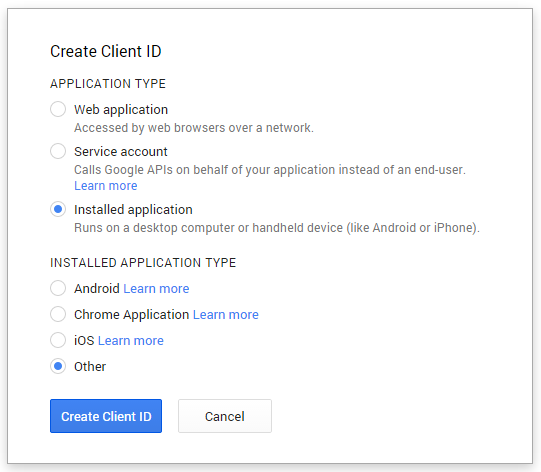
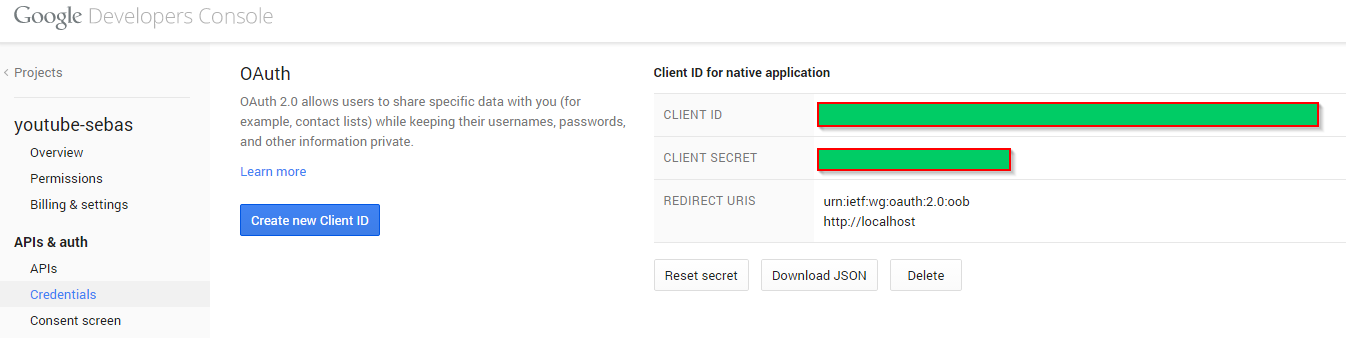
1.4 Create new client ID. Here you can take the data for the file client_secrets.json

create client id

client id created
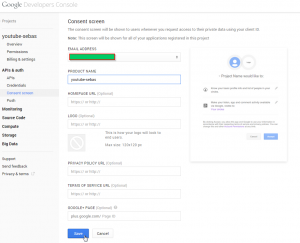
1.5 Fill in the consent screen

consent screen
1.6 You are done


Let’s do it

Now that you can use the youtube api, let’s go make an application:

2. Resources

To understand how the API works, there are three importants helps from google:
2.1 The introduction to how the API works: https://developers.google.com/youtube/v3/getting-started
2.2 The API reference: https://developers.google.com/youtube/v3/docs/, where you can see the methods, the resource json structure (to figure out where you can get the data), the diferents resouce propoerties and some samples.
2.3 The API explorer: https://developers.google.com/apis-explorer/#p/youtube/v3/ a very useful resource to try the API. Here you can use all the api, try with different parameters and see the json request and response. It’s very important to know that you can limit the response of the api on several ways. You can read it in the first resource and you can interactively try it in this resource to make sure that you get what you want and only that. For example, you can easily compose the «field» parameter of the API.

3. The Code

As a line of code is better than 1 hundred words of comments, let’s code:

3.1 The pom.xml

<?xml version="1.0" encoding="UTF-8"?>
<project xmlns="http://maven.apache.org/POM/4.0.0" xmlns:xsi="http://www.w3.org/2001/XMLSchema-instance" xsi:schemaLocation="http://maven.apache.org/POM/4.0.0 http://maven.apache.org/xsd/maven-4.0.0.xsd">
    <modelVersion>4.0.0</modelVersion>
    <groupId>es.sebas</groupId>
    <artifactId>youtube2</artifactId>
    <version>1.0-SNAPSHOT</version>

    <packaging>jar</packaging>

    <repositories>
        <repository>
            <id>google-api-services</id>
            <url>http://google-api-client-libraries.appspot.com/mavenrepo</url>
        </repository>
    </repositories>

    <properties>
        <project.build.sourceEncoding>UTF-8</project.build.sourceEncoding>
        <project.youtube.version>v3-rev91-1.17.0-rc</project.youtube.version>
        <project.http.version>1.19.0</project.http.version>
        <project.oauth.version>1.19.0</project.oauth.version>
        <project.build.sourceEncoding>UTF-8</project.build.sourceEncoding>

    </properties>
    <dependencies>

        <!-- YouTube Data V3 support -->
        <dependency>
            <groupId>com.google.apis</groupId>
            <artifactId>google-api-services-youtube</artifactId>
            <version>${project.youtube.version}</version>
        </dependency>

        <dependency>
            <groupId>com.google.http-client</groupId>
            <artifactId>google-http-client-jackson2</artifactId>
            <version>${project.http.version}</version>
        </dependency>

        <dependency>
            <groupId>com.google.oauth-client</groupId>
            <artifactId>google-oauth-client-jetty</artifactId>
            <version>${project.oauth.version}</version>
        </dependency>
        <dependency>
            <groupId>junit</groupId>
            <artifactId>junit</artifactId>
            <version>4.11</version>
        </dependency>
    </dependencies>

    <build>
        <plugins>
            <!-- Forces Maven to use Java 1.6 -->
            <plugin>
                <artifactId>maven-compiler-plugin</artifactId>
                <version>2.3.2</version>
                <configuration>
                    <source>1.6</source>
                    <target>1.6</target>
                    <compilerArgument></compilerArgument>
                </configuration>
            </plugin>
        </plugins>
    </build>
    <name>youtube2</name>
</project>


3.2 The methods used in this function
3.2.1 Authorize

public static Credential authorize() throws IOException {

        List<String> scopes = Arrays.asList("https://www.googleapis.com/auth/youtube");

        Reader reader = new InputStreamReader(PlayListTools.class.getResourceAsStream("/client_secrets.json"));
        // Load client secrets.
        GoogleClientSecrets clientSecrets
                = GoogleClientSecrets.load(
                        JSON_FACTORY,
                        reader);

        FileDataStoreFactory fileDataStoreFactory = new FileDataStoreFactory(new File(System.getProperty("user.home") + "/" + CREDENTIALS_DIRECTORY));
        DataStore<StoredCredential> datastore = fileDataStoreFactory.getDataStore("youtubesebas");

        // Set up authorization code flow.
        GoogleAuthorizationCodeFlow flow
                = new GoogleAuthorizationCodeFlow.Builder(HTTP_TRANSPORT,
                        JSON_FACTORY,
                        clientSecrets,
                        scopes)
                .setCredentialDataStore(datastore)
                .build();

        // Build the local server and bind it to port 9000
        LocalServerReceiver localReceiver = new LocalServerReceiver.Builder().setPort(8080).build();

        // Authorize.
        return new AuthorizationCodeInstalledApp(flow, localReceiver).authorize("user");
}

and the credentials for the authorization client_secrets.json (put here the data you get on section 1.4)

{
 "installed": {
 "client_id": "Enter your client id here",
 "client_secret": "Enter your client secret here"
 }
}


3.2.2 Recover all watch later items

public static List<PlaylistItem> getAllWatchLaterItems(Credential credential) {

        String wlPlaylistId = getWlID(credential);
        System.out.println("WatchLaterId : " + wlPlaylistId);
        return getAllPlayListItems(credential, wlPlaylistId);
}

public static List<PlaylistItem> getAllPlayListItems(Credential credential, String playListID) {
        // List to store all PlaylistItem items associated with the uploadPlaylistId.
        ArrayList<PlaylistItem> playlistItemList = new ArrayList<PlaylistItem>();

        /*
         * Now that the user is authenticated, the app makes a channel list request to get the
         * authenticated user's channel. Returned with that data is the playlist id for the uploaded
         * videos. https://developers.google.com/youtube/v3/docs/channels/list
         */
        YouTube youtube = new YouTube.Builder(new NetHttpTransport(), new JacksonFactory(), credential)
                .setApplicationName("youtube-sebas")
                .build();

        /*
         * Now that we have the playlist id for your uploads, we will request the playlistItems
         * associated with that playlist id, so we can get information on each video uploaded. This
         * is the template for the list call. We call it multiple times in the do while loop below
         * (only changing the nextToken to get all the videos).
         * https://developers.google.com/youtube/v3/docs/playlistitems/list
         */
        YouTube.PlaylistItems.List playlistItemRequest;
        try {
            playlistItemRequest = youtube.playlistItems().list("id,contentDetails,snippet");
            playlistItemRequest.setPlaylistId(playListID);

            // This limits the results to only the data we need and makes things more efficient.
            playlistItemRequest.setFields(
                    "items(id,contentDetails/videoId,snippet/title),nextPageToken,pageInfo");

            String nextToken = "";

            // Loops over all search page results returned for the uploadPlaylistId.
            do {
                playlistItemRequest.setPageToken(nextToken);
                PlaylistItemListResponse playlistItemResult = playlistItemRequest.execute();

                playlistItemList.addAll(playlistItemResult.getItems());

                nextToken = playlistItemResult.getNextPageToken();
            } while (nextToken != null);

        } catch (IOException ex) {
            Logger.getLogger(PlayListTools.class.getName()).log(Level.SEVERE, null, ex);
        }

        return playlistItemList;
}


3.2.3 Insert a new playList

public static String insertPlaylist(String playlistTitle, String playlistDesc, Credential credential) throws IOException {

        /*
         * We need to first create the parts of the Playlist before the playlist itself.  Here we are
         * creating the PlaylistSnippet and adding the required data.
         */
        PlaylistSnippet playlistSnippet = new PlaylistSnippet();
        playlistSnippet.setTitle(playlistTitle);
        playlistSnippet.setDescription(playlistDesc);

        // Here we set the privacy status (required).
        PlaylistStatus playlistStatus = new PlaylistStatus();
        playlistStatus.setPrivacyStatus("private");

        /*
         * Now that we have all the required objects, we can create the Playlist itself and assign the
         * snippet and status objects from above.
         */
        Playlist youTubePlaylist = new Playlist();
        youTubePlaylist.setSnippet(playlistSnippet);
        youTubePlaylist.setStatus(playlistStatus);

        /*
         * This is the object that will actually do the insert request and return the result.  The
         * first argument tells the API what to return when a successful insert has been executed.  In
         * this case, we want the snippet and contentDetails info.  The second argument is the playlist
         * we wish to insert.
         */
        // YouTube object used to make all API requests.
        YouTube youtube = new YouTube.Builder(new NetHttpTransport(), new JacksonFactory(), credential)
                .setApplicationName("youtube-sebas")
                .build();

        YouTube.Playlists.Insert playlistInsertCommand
                = youtube.playlists().insert("snippet,status", youTubePlaylist);
        Playlist playlistInserted = playlistInsertCommand.execute();

        // Pretty print results.
        System.out.println("New Playlist name: " + playlistInserted.getSnippet().getTitle());
        System.out.println(" - Privacy: " + playlistInserted.getStatus().getPrivacyStatus());
        System.out.println(" - Description: " + playlistInserted.getSnippet().getDescription());
        System.out.println(" - Channel: " + playlistInserted.getSnippet().getChannelId() + "n");
        return playlistInserted.getId();

}


3.2.4 Insert the previously recovered items (the watch later items)

public static void insertPlaylistItems(Credential credential, String playlistId, List<PlaylistItem> playListItems) {

        for (PlaylistItem playlistItem : playListItems) {
            try {
                System.out.println("Inserting Video, ID=" + playlistItem.getContentDetails().getVideoId() + " with title: " + playlistItem.getSnippet().getTitle());
                insertPlaylistItem(credential, playlistId, playlistItem.getContentDetails().getVideoId(), playlistItem.getSnippet().getTitle());
            } catch (IOException ex) {
                Logger.getLogger(PlayListTools.class.getName()).log(Level.SEVERE, null, ex);
            }
        }

}

private static String insertPlaylistItem(Credential credential, String playlistId, String videoId, String title) throws IOException {

        /*
         * The Resource type (video,playlist,channel) needs to be set along with the resource id. In
         * this case, we are setting the resource to a video id, since that makes sense for this
         * playlist.
         */
        ResourceId resourceId = new ResourceId();
        resourceId.setKind(RESOURCE_KIND_VIDEO);
        resourceId.setVideoId(videoId);

        /*
         * Here we set all the information required for the snippet section.  We also assign the
         * resource id from above to the snippet object.
         */
        PlaylistItemSnippet playlistItemSnippet = new PlaylistItemSnippet();
        playlistItemSnippet.setTitle(title);
        playlistItemSnippet.setPlaylistId(playlistId);
        playlistItemSnippet.setResourceId(resourceId);

        /*
         * Now that we have all the required objects, we can create the PlaylistItem itself and assign
         * the snippet object from above.
         */
        PlaylistItem playlistItem = new PlaylistItem();
        playlistItem.setSnippet(playlistItemSnippet);

        /*
         * This is the object that will actually do the insert request and return the result.  The
         * first argument tells the API what to return when a successful insert has been executed.  In
         * this case, we want the snippet and contentDetails info.  The second argument is the
         * playlistitem we wish to insert.
         */
        YouTube youtube = new YouTube.Builder(new NetHttpTransport(), new JacksonFactory(), credential)
                .setApplicationName("youtube-sebas")
                .build();
        YouTube.PlaylistItems.Insert playlistItemsInsertCommand
                = youtube.playlistItems().insert("snippet,contentDetails", playlistItem);
        PlaylistItem returnedPlaylistItem = playlistItemsInsertCommand.execute();

        printPlayListItem(returnedPlaylistItem);

        return returnedPlaylistItem.getId();

}


3.2.5 Some globals…

 /**
 * Global instance of the HTTP transport.
 */
 private static final HttpTransport HTTP_TRANSPORT = new NetHttpTransport();

 /**
 * Global instance of the JSON factory.
 */
 private static final JsonFactory JSON_FACTORY = new JacksonFactory();

/**
* Some constants...
*/
 private static final String RESOURCE_KIND_VIDEO = "youtube#video";
 private static final String CREDENTIALS_DIRECTORY = ".oauth-credentials";


3.2.6 The method that do the copy

public static void main(String[] args) {

        // Authorization.
        Credential credential = null;
        try {
            credential = PlayListTools.authorize();
        } catch (IOException ex) {
            Logger.getLogger(WacthLaterCopy.class.getName()).log(Level.SEVERE, null, ex);
        }

        List<PlaylistItem> wlPlayListItems = PlayListTools.getAllWatchLaterItems(credential);

        String playlistTitle = "Temporal Playlist " + Calendar.getInstance().getTime();
        String playlistDesc = "A private temporal playlist created with the YouTube API v3";
        String playlistId;
        try {
            playlistId = PlayListTools.insertPlaylist(playlistTitle, playlistDesc, credential);

            // If a valid playlist was created, adds a new playlistitem with a video to that playlist.
            PlayListTools.insertPlaylistItems(credential, playlistId, wlPlayListItems);
        } catch (IOException ex) {
            Logger.getLogger(WacthLaterCopy.class.getName()).log(Level.SEVERE, null, ex);
        }
}


3.2.7 The maven comand line to automate this

mvn exec:java -Dexec.mainClass=”es.sebas.youtube.WatChLaterCopy”


To be continued

Now we have the copy of the Watch Later List. In next post I will show :

  • How to Purge the Watch Later List
  • How to create a VideoLan List of the videos in our playLists

Write you later…

Sonar – Maven: A required class was missing

Me estoy pegando desde ayer para integrar nuestro actual proyecto con Sonar, para poder realizar pruebas de cobertura y mostrar estadísticas de infracciones de código, y tras la instalación de Sonar en local me he encontrado un problema al ejecutarlo las primeras veces.

Tras la instalación, al lanzar por primera vez Sonar con:

mvn sonar:sonar

obtenía errores al faltarme librerías, que no estaban en nuestro repositorio y he tenido que ir bajándome de MVNRepository, para luego instalarlas en nuestro Artifactory.

Tras incluir todas las librerías necesarias, al lanzar el comando me he encontrado con el siguiente error:

[ERROR] Failed to execute goal org.codehaus.mojo:sonar-maven-plugin:2.0:sonar
(default-cli) on project tbs: Execution default-cli of goal
org.codehaus.mojo:sonar-maven-plugin:2.0:sonar
failed: A required class was missing while executing
org.codehaus.mojo:sonar-maven-plugin:2.0:sonar:
Ljavax/persistence/EntityManagerFactory;

En principio no debería de producirse, ya que se supone que al descargar los JARs y subirlos, estos incluyen el pom con las dependencias sobre otras librerías.

Pero ha dado la casualidad de que para la librería plexus-classworlds-2.2.3 su pom está mal y necesita que incluyamos dos dependencias más: persistence-api-1.0 y javassist (yo he incluido la última versión: 3.12.1.GA).

De esta forma, el pom queda así:

  <dependencies>

    <dependency>

      <groupId>junit</groupId>

      <artifactId>junit</artifactId>

      <version>3.8.2</version>

      <scope>test</scope>

    </dependency>
    <dependency>
      <groupId>javax.persistence</groupId>
      <artifactId>persistence-api</artifactId>
      <version>1.0</version>

      <scope>compile</scope>

    </dependency>
    <dependency>
    <groupId>javassist</groupId>
    <artifactId>javassist</artifactId>
    <version>3.12.1.GA</version>

      <scope>compile</scope>

    </dependency>
  </dependencies>

Tenerlo en cuenta por si os encontráis con el mismo problema.

En caso de que la clase que os falte sea otra y no sepáis desde dónde se hace referencia, lanzar el comando en modo debug:

mvn sonar:sonar -X

Revisar las trazas y además del nombre de la clase que necesitáis, tomar nota de la clase donde se está invocando a la misma, como en este ejemplo:

A partir de aquí, primero tendréis que averiguar, tirando de Google, a qué librería pertenece la clase que os falta, y después en cuál de las que habéis incluido se encuentra la clase que la usa.

En mi caso la clase javax.persistence.EntityManagerFactory se encuentra en persistence-api-1.0.jar, así que lo busco en algún repositorio de Maven y lo subo a mi artifactory.

Y la clase que la requiere se encuentra en plexus-classworlds-2.2.3, así que me descargo el pom del Artifactory y lo modifico para incluir la dependencia que necesito, volviendo a subir el pom al Artifactory.

Una vez hecho, borro mi repositorio local, para forzar que se lo vuelva a descargar, y compruebo si necesito alguna dependencia más o ya funciona Sonar.

Un pequeño ejemplo con JAXB.

JAXB, acrónimo de ‘Java Architecture for Xml Binding‘, es un API para convertir objetos Java en xml y leer esos mismos xml para obtener objetos Java, que desde la versión 7 tenemos disponible en nuestros JDKs.

Recientemente nos surgió la necesidad, en uno de los proyectos en los que trabajo, de poder guardar ‘evidencias’ de objetos durante la ejecución de una serie de programas a modo de registro para poder analizar el comportamiento y evolución de una serie de datos calculados.

La primera idea para hacer esto sería el escribir un método ‘toString’ que nos devuelva los valores del objeto de tal forma que los podamos ir volcando a uno o varios ficheros, para luego poder analizarlos.

Pero fue esa misma necesidad de poder analizarlos posteriormente la que me hizo pensar en hacer algo más elaborado, de forma que no solo pudiésemos obtener una representación de cada objeto en un momento dado, si no también poder luego explotar esa información desde nuestro aplicación de análisis.

Así fue como decidí tirar de JAXB, ahora que se ha incorporado a Java 7, pensando en obtener una representación que no dependiese de formatos propios y fuese fácilmente explotable.

La ventaja de JAXB reside en su capacidad de realizar ‘marshal’ y ‘unmarshal’ de objetos Java de forma directa, mediante el uso de anotaciones para indicar qué campos son los que queremos incluir en el xml, de una forma rápida, sencilla y no dependiente de un esquema.

El no depender de un esquema nos aporta además la ventaja añadida de poder realizar cambios sobre los objetos sin necesitar de realizar cambios en el parser que usáramos para convertir a xml y viceversa.

Para ver lo sencillo que es, planteemos un ejemplo.

Supongamos que tenemos una Clase Empresa:

package com.art4software.java.jaxb.example.po;

import java.util.ArrayList;

import javax.xml.bind.annotation.XmlElement;
import javax.xml.bind.annotation.XmlRootElement;
import javax.xml.bind.annotation.XmlType;

import com.art4software.java.jaxb.example.MarshalClass;

@XmlRootElement
@XmlType (propOrder = { "nombreEmpresa", "idEmpresa", "direccion", "numEmpleados", "empleados" })
public class Empresa extends MarshalClass {

	private int idEmpresa;
	private String nombreEmpresa;
	private String direccion;
	private int numEmpleados;
	private ArrayList<Empleado> empleados;

	public int getIdEmpresa() {
		return idEmpresa;
	}

	@XmlElement
	public void setIdEmpresa(int idEmpresa) {
		this.idEmpresa = idEmpresa;
	}

	public String getNombreEmpresa() {
		return nombreEmpresa;
	}

	@XmlElement
	public void setNombreEmpresa(String nombreEmpresa) {
		this.nombreEmpresa = nombreEmpresa;
	}

	public String getDireccion() {
		return direccion;
	}

	@XmlElement
	public void setDireccion(String direccion) {
		this.direccion = direccion;
	}

	public int getNumEmpleados() {
		return numEmpleados;
	}

	@XmlElement
	public void setNumEmpleados(int numEmpleados) {
		this.numEmpleados = numEmpleados;
	}

	public ArrayList<Empleado> getEmpleados() {
		return empleados;
	}

	@XmlElement
	public void setEmpleados(ArrayList<Empleado> empleados) {
		this.empleados = empleados;
	}
}

Como podemos ver nuestra Empresa tiene Empleados:

package com.art4software.java.jaxb.example.po;

import java.util.Date;

import javax.xml.bind.annotation.XmlElement;
import javax.xml.bind.annotation.XmlRootElement;

import com.art4software.java.jaxb.example.MarshalClass;

@XmlRootElement(name="Empl")
public class Empleado extends MarshalClass{

	private int id;
	private String nombre;
	private String titulo;
	private boolean activo=false;
	private Integer numeroEmpl;
	private Date fechaAlta;

	public int getId() {
		return id;
	}

	@XmlElement
	public void setId(int id) {
		this.id = id;
	}

	public String getNombre() {
		return nombre;
	}

	@XmlElement
	public void setNombre(String nombre) {
		this.nombre = nombre;
	}

	public String getTitulo() {
		return titulo;
	}

	@XmlElement
	public void setTitulo(String titulo) {
		this.titulo = titulo;
	}

	public boolean isActivo() {
		return activo;
	}

	@XmlElement
	public void setActivo(boolean activo) {
		this.activo = activo;
	}

	public Integer getNumeroEmpl() {
		return numeroEmpl;
	}

	@XmlElement
	public void setNumeroEmpl(Integer numeroEmpl) {
		this.numeroEmpl = numeroEmpl;
	}

	public Date getFechaAlta() {
		return fechaAlta;
	}

	@XmlElement
	public void setFechaAlta(Date fechaAlta) {
		this.fechaAlta = fechaAlta;
	}

}

Si os fijáis usamos 3 anotaciones: XmlRootElement, XmlType y XmlElement.

La primera marca el elemento raíz de nuestra clase (en nuestro caso el nombre de la clase). Con XmlType y la propiedad ‘propOrder’ cambiamos el orden en que se escribirán los atributos en el xml resultante.

Finalmente usando XmlElement en el setter de los atributos que nos interesa que se incluyan en el xml, marcamos los campos de nuestro interés.

Si os fijáis, ambas clases heredan de una tercera clase: MarshalClass.

¿Y para qué?

En mi caso, dado que la acción de guardar ‘evidencias’ se realizará sobre clases distintas, con esta herencia puedo limitar a un tipo común el manejo de las clases a guardar, haciendo que hereden de dicha clase el método de guardado:

package com.art4software.java.jaxb.example;

import java.io.File;
import java.io.FileWriter;
import java.io.IOException;

import javax.xml.bind.JAXBContext;
import javax.xml.bind.JAXBException;
import javax.xml.bind.Marshaller;

public class MarshalClass {

	public void generateXML (String nameFile) {

		try {
			File file = new File (nameFile);
			JAXBContext jc = JAXBContext.newInstance(this.getClass());
			Marshaller jaxbMarshaller = jc.createMarshaller();

			jaxbMarshaller.setProperty(Marshaller.JAXB_FORMATTED_OUTPUT, true);

			jaxbMarshaller.marshal(this, new FileWriter(nameFile, true));

		} catch (JAXBException e) {
			e.printStackTrace();
		} catch (IOException e) {
			e.printStackTrace();
		}
	}
}

Si os fijáis en el código del método, que será común para todos, realizar el Marshal es tan sencillo como:

  1. Obtener un JAXBContext sobre la clase a representar en xml (en nuestro caso).
  2. A partir de este contexto crear un ‘Marshaller’
  3. Configurar el formato de salida.
  4. Invocar al método para escribir la clase a xml.

En mi ejemplo uso un FileWriter en lugar de un File (cuya declaración he dejado en el ejemplo aunque no se usa) porque así podría ir volcando todas las representaciones a un único fichero, donde se iría añadiendo el xml de cada clase en cada invocación.

Si usáramos el File, estaríamos machacando el contenido si usamos el mismo nombre de fichero, o generando un nuevo fichero por cada invocación usando nombres distintos.

Ahora, para ejecutarlo:

package com.art4software.java.jaxb.example;

import java.util.ArrayList;
import java.util.Date;

import com.art4software.java.jaxb.example.po.Empresa;
import com.art4software.java.jaxb.example.po.Empleado;

/**
 *
 * @author mvcarrillo
 *
 */
public class JAXBExample {

	/**
	 * @param args
	 */
	public static void main(String[] args) {

		marshallingExample();

	}

	/**
	 * Crea una empresa y 10.000 empleados.
	 */
	private static void marshallingExample () {

		long time = System.currentTimeMillis();
		System.out.println ("Inicio: " + new Date(time));
		Empresa cc = new Empresa ();
		cc.setIdEmpresa(1);
		cc.setDireccion("En la nube");
		cc.setNombreEmpresa("Art4Software");
		cc.setNumEmpleados(25000);

		ArrayList<Empleado> alCU = new ArrayList<Empleado> ();
		int init = 20000;
		for (int i=1;i<10000;i++) {
			Empleado cu = new Empleado ();
			cu.setId(i);
			cu.setActivo(true);
			cu.setNumeroEmpl(new Integer (init++));
			cu.setNombre("Empleado " + i);
			cu.setTitulo("SW Architect");
			cu.setFechaAlta(new Date(System.currentTimeMillis()));

			alCU.add(cu);
		}

		cc.setEmpleados(alCU);

		long time2 = System.currentTimeMillis();

		System.out.println ("Generacion: " + (time2-time) + " milisegundoss - Marshaling: " + new Date (time2));

		cc.generateXML("Art4Software-Datos.xml");

		long time3 = System.currentTimeMillis();

		System.out.println ("Fin: " + new Date(System.currentTimeMillis()) + " - Tiempo Total: " + (time3 - time) + " milisegundos");

	}
}

Para realizar la conversión de todos los objetos, tan solo necesitamos invocar al método sobre el objeto ‘Empresa’, sin tener que hacerlo por cada objeto del tipo ‘Empleado’ que pueda contener en el ArrayList.

Como podéis ver, hemos metido unas trazas para ver cuánto tiempo tarda en realizar la creación de los objetos y el volcado a xml, obteniendo los siguientes tiempos (con JDK 1.7u21, eclipse Indigo, en un PhenomII x6 1090T con 8GB RAM):

Inicio: Fri Jun 07 22:38:56 CEST 2013
Generacion: 29 milisegundoss – Marshaling: Fri Jun 07 22:38:56 CEST 2013
Fin: Fri Jun 07 22:38:57 CEST 2013 – Tiempo Total: 312 milisegundos

Menos de medio segundo es un tiempo realmente bueno para lo que necesitamos realizar.

Ahora, a partir de aquí podríamos crearnos una aplicación que cargase un xml, o los xml contenidos en un directorio para una fecha concreta, y obtuviese todos los objetos grabados de nuevo para analizar los resultados.

Por último, importante tener en cuenta la siguiente tabla con la equivalencia de tipos de datos:

JAXB - Tabla Datos

Correspondencia de datos por defecto.

Truco: Spring 3.1 y error con persistence-unit de test.

Estaba recordando Spring, siguiendo un tutorial de Francisco Grimaldo, cuando me he encontrado con un curioso error.

Tras implementar un Unit Test para la recuperación de datos de la base de datos, la ejecución ha empezado a darme el siguiente error:

org.springframework.beans.factory.BeanCreationException: Error creating bean with name ‘entityManagerFactory’ defined in class path resource [test-context.xml]: Invocation of init method failed; nested exception is java.lang.IllegalStateException: Conflicting persistence unit definitions for name ‘springappPU’: file:/H:/Users/Manuel/Documents/workspace-sts-3.1.0.RELEASE/webMeet/target/classes, file:/H:/Users/Manuel/Documents/workspace-sts-3.1.0.RELEASE/webMeet/target/test-classes
at org.springframework.beans.factory.support.AbstractAutowireCapableBeanFactory.initializeBean(AbstractAutowireCapableBeanFactory.java:1486)
at org.springframework.beans.factory.support.AbstractAutowireCapableBeanFactory.doCreateBean(AbstractAutowireCapableBeanFactory.java:524)
at org.springframework.beans.factory.support.AbstractAutowireCapableBeanFactory.createBean(AbstractAutowireCapableBeanFactory.java:461)
at org.springframework.beans.factory.support.AbstractBeanFactory$1.getObject(AbstractBeanFactory.java:295)
at org.springframework.beans.factory.support.DefaultSingletonBeanRegistry.getSingleton(DefaultSingletonBeanRegistry.java:223)
at org.springframework.beans.factory.support.AbstractBeanFactory.doGetBean(AbstractBeanFactory.java:292)
at org.springframework.beans.factory.support.AbstractBeanFactory.getBean(AbstractBeanFactory.java:194)
at org.springframework.context.support.AbstractApplicationContext.getBean(AbstractApplicationContext.java:1117)
at org.springframework.context.support.AbstractApplicationContext.finishBeanFactoryInitialization(AbstractApplicationContext.java:922)
at org.springframework.context.support.AbstractApplicationContext.refresh(AbstractApplicationContext.java:479)
at org.springframework.context.support.ClassPathXmlApplicationContext.<init>(ClassPathXmlApplicationContext.java:139)
at org.springframework.context.support.ClassPathXmlApplicationContext.<init>(ClassPathXmlApplicationContext.java:83)

Tras comprobar si había metido la pata en alguno de los pasos y darle muchas vueltas, sin encontrar dónde estaba el error, he terminado encontrando una solución en (como no) Stackoverflow.

La solución, por si os sirve a alguno de ayuda, pasa por renombrar la persistence-unit usada por los Unit Test de nombre:

test/resources/META-INF/persistence.xml

<persistence-unit name="springappPUtest" transaction-type="RESOURCE_LOCAL">
	</persistence-unit>

test/resources/test-context.xml

<property name="persistenceUnitName" value="springappPUtest"></property>

Y luego unificar en el mismo persistence.xml ambos ficheros.

main/resources/META-INF/persistence.xml

	<persistence-unit name="springappPU" transaction-type="RESOURCE_LOCAL">
	</persistence-unit>

	<persistence-unit name="springappPUtest" transaction-type="RESOURCE_LOCAL">
	</persistence-unit>

No es la solución más óptima, pero al menos permite que el Unit Test se ejecute.